
Tom Bracken, Staff Writer.
You know the polish. It goes on glassy and thick, promises seven to ten days on the label, and by Wednesday there is a chip at the edge of your thumbnail that somehow gets bigger every time you load the dishwasher. You have a drawer full of half-finished bottles bought because the last one “didn’t work,” and you have typed some version of why does my gel-effect polish peel off in one sheet into a search bar at eleven at night. The truth is less about the bottle and more about what happens to your nail plate before the brush ever touches it. A nail is not a flat, sealed surface. It is closer to a stack of shingles, and polish only grips well when those shingles lie flat and dry. Get that part right and even a modest formula holds. Skip it and the fanciest gel-effect topcoat on the shelf will lift by the weekend.
- Prep matters more than product: most early chipping traces back to oil, moisture, or surface debris left on the nail plate, not to the polish itself.
- Thin coats cure and bond better than thick ones: two thin layers outlast one heavy layer because each layer dries all the way through instead of skinning over on top.
- The first 24 hours decide the outcome: hot dishwater, tight gloves, or a hot shower right after painting can undo a manicure before it ever gets a chance to harden fully.
Why Gel-effect Polish Behaves Differently From Regular Lacquer
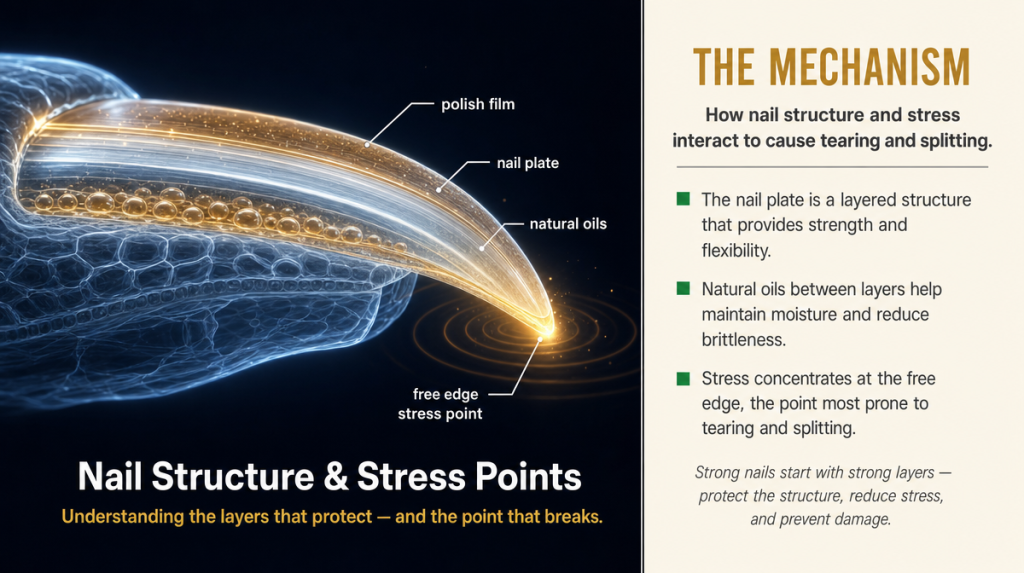
Gel-effect formulas rely on a heavier film of resins and polymers that stiffen as solvents evaporate, similar to how a thin layer of varnish on a wood table dries into a rigid, glassy shell rather than staying soft. That stiffness is what gives the color its dome and shine, but it also means the polish is less forgiving of a nail plate that flexes, bends, or has any oil sitting between it and the color coat.
“A nail plate is porous and it moves with the finger underneath it,” said Dr. James Morrison, PhD, describing the mechanics of adhesion in topical formulations. “A film that is too rigid for that movement is going to separate at the weakest point first, usually the free edge.”
That is why gel-effect polish chips at the tip before it chips in the middle. The free edge takes the most flex and the most contact with keys, zippers, and drawer handles. Understanding that gives you a target: everything in your routine should aim at reducing flex and contact stress at that edge, not just at making the color coat itself thicker.
“A film that is too rigid for that movement is going to separate at the weakest point first, usually the free edge.” – Dr. James Morrison, PhD, Biochemist
Prepping The Nail Plate Before You Ever Open The Bottle
Start with clean, completely dry nails. Wash your hands, then wipe each nail with a bit of rubbing alcohol on a cotton pad. This step removes the natural oil layer that sits on the nail plate, the same oil that makes it hard for polish to grip, similar to trying to tape something to a greasy countertop.
Push back cuticles gently rather than cutting them, and buff the surface lightly with a fine-grit buffer, just enough to knock down shine, not enough to thin the nail. Avoid soaking your hands in warm water right before polishing. Water makes the nail plate swell slightly, and as it dries back down after painting, the polish film can crack along with it.
A base coat is not optional for gel-effect formulas. It gives the pigmented layer something even to bond to and prevents staining from deeper, more pigmented shades. Skipping it to save a step is one of the most common reasons a manicure looks fine on day one and ragged by day three.
Applying Thin Coats Without Leaving The Polish Patchy
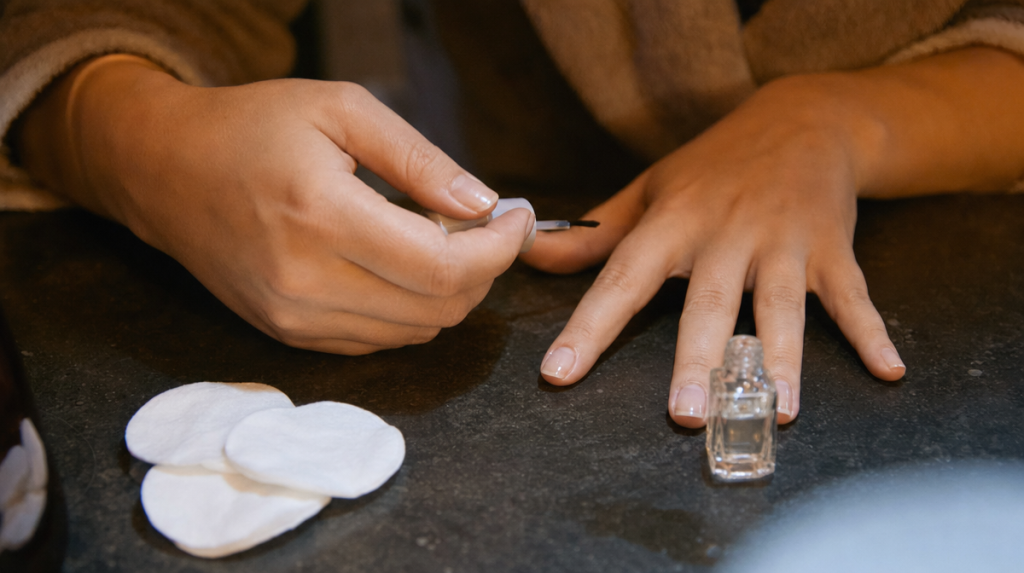
The instinct with gel-effect polish is to load the brush and cover everything in one pass, since the formula is thicker and the color often looks sheer at first. Resist that. A thick single coat dries on top while staying soft underneath, and that soft interior layer is what eventually causes the whole thing to peel in one sheet, which is the exact complaint most people search for.
Instead, apply two thin coats, waiting the full recommended time between them, usually about two minutes for gel-effect formulas even without a lamp. Cap the free edge each time, meaning you drag the brush over the very tip of the nail, sealing that vulnerable spot where chipping starts first.
A simple test while you work: tilt your hand under a lamp. If you can see brush strokes or drag marks, the coat is too thick in that spot. Thin, even coats look almost sheer wet and build to full opacity by the second layer.
The First 24 Hours: What Wrecks A Fresh Manicure
Gel-effect polish without a curing lamp never fully hardens the way true gel does. It reaches a workable dry state within an hour or two, but the film keeps hardening for closer to a full day. That window is where most damage happens, often without the person realizing why.
Hot dishwater is a common culprit. Heat softens the still-curing polymer layer, and detergent strips surface oils meant to protect the edge. Tight gloves, especially rubber cleaning gloves, press and shift the still-soft film. Even a long, hot shower the same evening can leave faint dents where fingertips pressed against a washcloth.
Professor Margareta Lindberg, MD, PhD, who has studied barrier function in skin and its appendages, notes that the nail unit shares some behavior with skin under occlusion. “Trapping moisture and heat against any keratin surface softens it temporarily,” she said. “A freshly applied film is more vulnerable during that window than people expect.” Simple fix: wear thin cotton gloves for chores the same day, and let dishwater run cooler than usual.
“Trapping moisture and heat against any keratin surface softens it temporarily. A freshly applied film is more vulnerable during that window than people expect.” – Professor Margareta Lindberg, MD, PhD, Dermatologist and researcher
Reading Wear Patterns To Diagnose What Went Wrong
If polish lifts as one intact sheet, the cause is almost always oil or moisture left on the nail before application, or a base coat that was skipped entirely. If it chips only at the tips while the rest stays glossy, look at daily habits: typing, opening cans, or gripping a steering wheel wear down the free edge faster than anything else.
Fine cracking across the whole nail, almost like a dried lakebed, usually points to coats applied too thick, so the surface hardened before the interior did. Color that fades or turns cloudy without chipping is typically UV exposure or repeated hot water contact breaking down the pigment binder over time, not a defect in the product.
Keeping a rough mental log for a week or two, when did it chip, on which hand, doing what, tells you more about your own routine than any bottle label will. Most people find the damage clusters around one or two specific habits once they actually look for the pattern.
Marketing Claims Worth Trusting Versus Ones To Ignore
Terms like “gel-effect,” “long-wear,” and “chip-resistant” describe formula chemistry, not a guarantee tied to your specific hands. Numbers on a label, such as ten-day wear, are typically derived from controlled lab conditions with minimal hand exposure to water, heat, or friction, closer to a best-case scenario than an average one.
A glossy finish out of the bottle says more about the topcoat than the base formula’s durability. Genuine durability tends to correlate more with how the polish behaves during application, whether it self-levels without pooling at the cuticle, than with anything printed on the front label.
Dr. Claire Dubois, MD, a board-certified dermatologist with an interest in how cosmetic products interact with skin and nail tissue over repeated use, points out that formula marketing rarely addresses the biggest variable. “The product is one part of the outcome,” she said. “Application technique and daily hand exposure to water and friction usually explain more of the difference in how long a manicure lasts.”
“The product is one part of the outcome. Application technique and daily hand exposure to water and friction usually explain more of the difference in how long a manicure lasts.” – Dr. Claire Dubois, MD, Board-certified dermatologist
Adjusting Your Routine For Humid Summers And Dry Winters
East Coast humidity in July can slow down solvent evaporation, leaving polish tacky longer than usual and more prone to smudging if you touch anything too soon. In that weather, extend the wait time between coats by another minute or two, and avoid painting nails right before stepping outside into heat.
Dry winter air, especially with indoor heating running constantly, pulls moisture out of the nail plate itself, making it more brittle and more likely to crack rather than peel. A thin layer of cuticle oil massaged in nightly during winter months helps the nail plate stay flexible enough to move with the polish film instead of against it.
Fall is a natural moment to reset a nail routine anyway, with pumpkin-spice season nudging a lot of people toward deeper shades that show wear differently than the bright corals of summer. Deeper pigments tend to hide minor tip wear longer, which is worth knowing if you are choosing a shade for a week you cannot redo your nails.
A Quick Self-test Before You Commit To A Shade
Before painting a full set, do a single-nail trial on your smallest finger, the one that gets the least visible attention if the color reads differently than expected. Apply your normal two thin coats and topcoat, then go about a normal afternoon.
Check it that evening under both daylight and indoor lamp light. Undertones shift noticeably between the two, and a shade that looked flattering in a drugstore aisle under fluorescent light can look chalky or gray at home.
This small trial also tells you how your specific formula behaves on your nail chemistry, since oil production and nail plate texture vary enough between people that the same bottle can wear differently on two different hands. Five minutes of testing saves a week of wondering why a manicure that worked for a friend does not hold up on you the same way.
Key Takeaways
A gel-effect manicure lives or dies on three things: a clean, oil-free nail plate before you start, thin even coats that cure all the way through rather than skinning over, and gentle treatment during the first 24 hours while the film is still hardening. The polish itself matters less than most labels suggest. Technique and daily habits explain most of the difference between a manicure that lasts ten days and one that chips by Wednesday.
A Short Pre-manicure Checklist
- Wipe nails with rubbing alcohol to remove natural oils
- Buff lightly, just enough to dull shine
- Apply a base coat, never skip it
- Paint two thin coats, capping the free edge each time
- Wait the full recommended time between coats
- Avoid hot dishwater, tight gloves, or long hot showers for the first day
- Add cuticle oil nightly in dry winter months
- Test a single nail under daylight and lamp light before committing to a full set
Sources
1. American Academy of Dermatology, public guidance on nail care and manicure safety, 2023
2. Mayo Clinic, general patient guidance on nail health, 2022
3. Journal of Cosmetic Dermatology, formulation and adhesion studies on nail lacquer films, 2021
Professor Margareta Lindberg, MD, PhD: Dermatologist and researcher with extensive experience studying skin aging, barrier function, and connective tissue, including collaborations on topical skincare formulations.
Dr. James Morrison, PhD: Biochemist with a research background in dermal delivery and formulation science, focused on how topical ingredients interact with and penetrate the skin barrier.
Dr. Claire Dubois, MD: Board-certified dermatologist with experience in cosmetic dermatology and clinical research, including studies evaluating topical and in-office dermatologic approaches.
This article is for general information and does not replace personalized advice from a dermatologist or nail care professional.
Individual results vary based on nail chemistry, application technique, and daily habits.